
Introduction to Photography
- BR Photography
- Oct 27, 2023
- 7 min read

This is an excerpt from a workshop I'm putting together.

Workshop Summary

Introductions
I've been taking photos since January 2015. I enjoy shooting all kinds of subjects but my specialty is landscape scenery and wildlife. Based in Sherwood Park, I love to travel to the Rocky Mountains of Alberta and BC.
Goal Setting
Let me know what you want to get out of this workshop. I will do my best to tailor the material to the class's goals.

Exposure Fundamentals
Another term for a photograph is exposure. This comes from the fact that in order to take a photo, we expose the camera sensor to light in a very precise fashion. Three quantities define an exposure: exposure time (shutter speed), aperture size (f-stop), and sensitivity (ISO).

Exposure Fundamentals: Sensitivity - ISO
In the days of film, film sensitivity was standardized by the International Standards Organization (ISO). Today, digital cameras use the same system. The higher the number, the more sensitive the film or camera sensor (it’s a little more complicated than that but this will do for now). The trade off with high sensitivity is noise or grain. Generally, we want to use the lowest ISO we can get away with. Common values: ISO 100, ISO 200, ISO 400, ... ISO 6400.

Exposure Fundamentals: Aperture - F-stop
The lens has an opening that allows light through to the sensor called the aperture. We can control the size of the opening to let more or less light through. Historically, these changes using different plates called “stops”. The lower the f-stop the wider the aperture. A wide aperture lets in lots of light and gives a narrow depth of field. A narrow aperture lets in a small amount of light and gives a wide depth of field. Common values: f/3.5, f/4, f/5.6, …f/11.

Exposure Fundamentals: Exposure Time - Shutter Speed
The time the sensor is exposed to light is the final aspect of an exposure. By controlling the length of time the shutter is open, we can “freeze” motion in place. Sometimes this is also called “shutter speed”. A longer exposure time will let in more light but movement may blur. A shorter exposure time lets in less light but will allow us to capture faster moving subjects. Common values: 1/50s, 1/100s, 1/250s, 1/500s, 1/1000s.

Getting To Know Your Camera
After the obvious viewfinder/screen and shutter button, modern digital cameras have an overwhelming amount of buttons, dials, switches and software controls. We want to be able to manipulate them efficiently to take the photos we want when we want them. Nothing is more frustrating than missing a shot because you were fighting the camera controls. Lots of practice is key. It should be second nature to change the ISO, aperture, and exposure time. The manual for my camera shows the diagram above. The online manual is very helpful. https://helpguide.sony.net/ilc/2230/v1/en/contents/T P1000669448.html
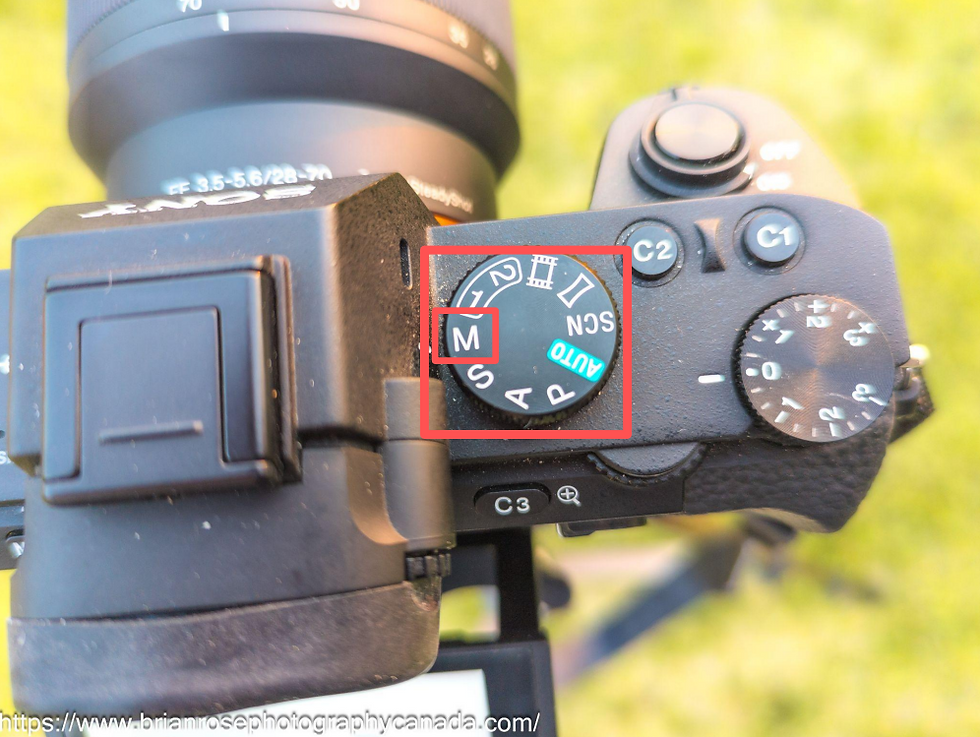
Getting to Know Your Camera: Manual Exposure Mode
To promote greater understanding of composing an exposure, set the camera to full manual exposure “M”. This requires you to control all three previously mentioned quantities to create a properly exposed photo. After we get more familiar with each of the three aspects, we can use the camera’s Priority modes to our advantage. When I was starting out, my instructor insisted that all of the assignment photos were shot using manual exposure mode.

Getting to Know Your Camera: Built-in Light Meter
We use the camera’s built-in light meter to make sure the photo is properly exposed. When the little tick above the number line reads “0”, the exposure is correct. If we take a photo with the tick to the left, that is called “underexposed” and the resulting photo will be too dark. To the right of center is “overexposed” and the photo will be too bright.

Getting to Know Your Camera: Exposure Time
The simplest way of adjusting the exposure is by changing the exposure time. However, it is important to be aware of the other effects of changing the exposure time. A shorter time will result in a darker exposure (left). A longer time will result in a brighter exposure(right).

A longer exposure time will be more susceptible to motion blur either from the camera or the subject. At the extreme, the slight vibration from simply pressing the shutter release button can blur the photo. Similarly, a shorter exposure time will “freeze” fast motion in place. So what is the “right” exposure time? Is there such a thing? In general for ALL photos, the answer is no. This is where your creativity comes in.

A few guidelines regarding exposure time:
Be cautious when shooting handheld with exposure time around 1/100s or longer. It is still viable to shoot handheld to about 1/30s if you are careful. We’ll talk about some mitigation techniques if you find you need more light yet can’t extend the exposure time.
With a fast moving subject, it is not always best to set your exposure time to extremely fast: 1/2500s or faster. When the subject is “frozen” completely, it removes any sense of speed.

Getting to Know Your Camera: Aperture Size
What about aperture adjustments? By varying the aperture, we can control the amount of light that reaches the sensor. Should we use the aperture instead of exposure time? Learning to use both together is the goal of this workshop. Due to the physics of how the lens works, the size of the aperture has a big impact on what is called the “Depth of Field”. Depth of Field refers to how much of the scene is in sharp focus. The above image is credited to Cbuckley, CC BY-SA 3.0, https://commons.wikimedia.org/w/index.p hp?curid=1911215

A wide aperture (low f-stop) will result in a narrow depth of field. A narrow depth of field will have the subject in sharp focus with the background blurred. For this photo, my aperture was f/4.0. The effect gets even more pronounced with wider apertures like f/2.0. Depth of field is also dependent on the focal length and distance to the subject. A handy calculator for DoF is here: https://www.photopills.com/calculators/dof

A narrow aperture (high f-stop) will result in a large depth of field. A large depth of field will have the foreground as well as the background in sharp focus. For this photo, the aperture was f/9.0. The street lights and signs are sharp as are the buildings in the distance. When adjusting the aperture, it is important to keep these effects in mind. For this reason, many photographers select an aperture for creative reasons rather than to control the amount of light.

The final setting that we can use to control the amount of light in the exposure is the sensitivity or ISO. A low ISO corresponds to low sensitivity and high ISO corresponds with high sensitivity. Why would we want low sensitivity? The reason is that the term “sensitivity” is a bit of a misnomer. It is better understood as boost or gain. The light in the image is the signal. When we “boost” the image because it is dark, we also boost the noise. Some of you will recognize this as a signal to noise issue. This photo was shot with ISO 25600, f/3.5, 1/500s to capture the splashing water. But, the darker areas are very noisy and grainy.

For the best image quality, we want to minimize noise. This means we choose a low sensitivity (ISO). However, we also need to make sure we have enough light (strong signal) to create a properly exposed image. If it’s sunny, no problem. In low light, this means we will need to gather more light in some other way. Using our new knowledge, what should we do? Use either a longer exposure time or a larger aperture or both. What if we’re at the limit? Then we must increase the sensitivity to get the shot we want. This photo was shot with ISO 100, f/3.5, 1.6s. The noise and grain are gone. But, the moving people and water have blurred.

This can seem a bit overwhelming. My thought process is as follows when composing an exposure:
Select an aperture size based on type of photo or other creative requirements.
Start with ISO 100.
Choose an exposure time using the light meter that will give a properly exposed image.
If the exposure time is too long, go back to step 2 and choose ISO 200, 400, etc. until the exposure time is acceptable.
If the ISO gets too high, select a larger aperture if possible and try again (back to step 3).
If you have a tripod and a longer exposure time is acceptable, that is also a good solution. However, the above steps are still applicable albeit with a larger window of acceptable exposure time. Just remember, if your goal is to capture fast motion a lengthy exposure time stabilized by a tripod won't help.

With this night scene, I was looking for a narrow aperture. This does two things: creates a very large depth of field and produces the “starburst” effect around the lights. I had taken a few other test shots so I knew ISO 100 would be too dark. So starting at at ISO 320, f/25 and 30s, we see the image on the left. This is too dark. 30s is the maximum for the built-in timer so I increased the ISO to 1000 creating the image in the center. This is close but still a bit dark. I got a little impatient so next I tried ISO 8000 and produced the right image. This is over exposed. I could have increased the aperture size but instead settled on ISO 1250.
Composition and Style Guidelines
Composition and style are how we make out photos stand out. You may have heard of a few guidelines such as the "rule" of thirds or leading lines. This is where I'm going to end this tutorial. I may create a dedicated tutorial for composition and style in the future. Please feel free to send me an email if you have any questions.


Comments