
Photographing Birds and other Wildlife
- BR Photography
- Jul 13, 2023
- 5 min read


Lately, I've really enjoyed photographing the birds and squirrels in the backyard. The same principles apply when photographing other wildlife. At the Whyte Ave Art Walk this past weekend, many people asked how to take some of these photos. I'd like to discuss some of the tips and tricks I've learned.
Skip ahead:
Camera Setup

First, the simplest aspect is setting up the camera. This section is not specifically tied to birds. It is applicable to other animals or fast moving subjects. Birds move fast. So, a fast shutter speed is needed. In the example above, the shutter speed was 1/1000s and some motion blur is still evident. I have since increased the speed and recommend setting the shutter speed to 1/2000s. If you are still seeing unwanted motion blur, go for an even faster shutter speed (1/2500s, 1/3000s, 1/3500s...). On the other hand if your images look too static with no motion at all, you will want to reduce the shutter speed (1/1250s, 1/1000s, 1/800s...) to introduce a bit of motion blur. This can be very difficult to get exactly right.


As the name suggests we want to prioritize shutter speed over everything else. So, set the dial to shutter priority. In order to compensate for varying light and maintain proper exposure levels, the camera needs to be able to vary aperture and/or ISO. Automatic ISO does the trick and is easy to setup.

I often shoot as the sun is setting or in the shadows. In these low light conditions, I set the upper range to ISO 25, 600. I'm not worried about noise ever since the addition of the high ISO noise reduction in Lightroom. I've done a write up on that feature earlier this year.

It's difficult to predict the movements of the birds, so I set the camera to continuous (burst) shooting - High so I can take lots of photos in rapid succession. When I see the birds moving, I push and hold the shutter. A speedy memory card is also important so the camera can write all the images without stalling.

Autofocus is next. In order to ensure the successive burst of images stays in focus, I set the autofocus to continuous. This makes sure the camera continues to adjust focus as the shutter button is held down.

The autofocus area may also need refinement. Instead of the entire frame, I set it to Center. A bit of experimenting may be needed to find the best setting for your camera and shot.

Lastly, the final aspect of the setup is the white balance. We're trying to eliminate as much delay as possible. So we want to move away from auto white balance. I usually set it to daylight. Although cloudy is also an option. It doesn't matter that much since it's easy to fix in Lightroom.
If your camera supports it, enabling the electronic (silent) shutter also goes a long way towards not spooking the birds.
The basic camera setup is now complete. Again, this setup should perform well for any fast moving subject not just birds. Keep reading for more details on my specific setup for the birds at the feeder in the backyard.
Bird and Bird Feeder Specific Tips
While I enjoy hiking and exploring in search of animals and scenery, it is so much more convenient to have the birds come to me. So with a bird feeder (or feeders), the backyard is nice and appealing to a variety of birds. Check out Cornell Labs AllAboutBirds for information on the species in your area and what they like.

The birds are very active around the feeder in the backyard so I set the camera up with a view of the feeder itself as well as the surroundings. I'm using a camera clamp to secure the camera to the handrail. Before I had the clamp, I used a tripod with the same results.

I set the focal length as short as possible to give a wide field of view. I also position the camera with the feeder at the lower left third intersection to capture birds mid-flight to/from the feeder.

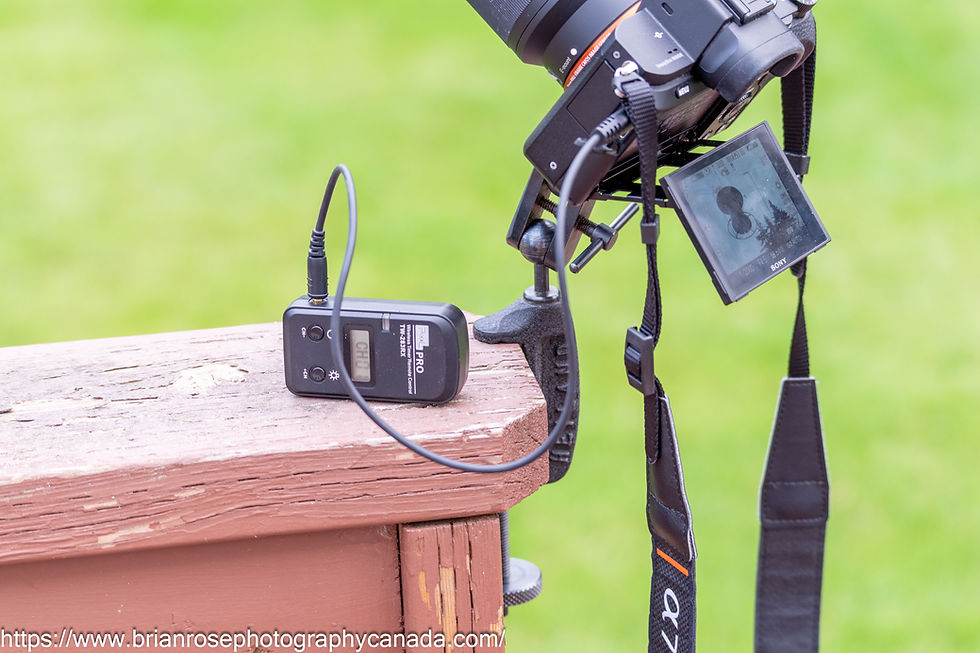

Key to this setup is the wireless remote shutter control. This allows me to stand far away so as not to spook the birds while still being able to trigger the shutter burst.
Once the camera is setup and in position, all that is needed is patience. Get some coffee wait for the birds to get hungry. Over time, I've learned how the birds behave. Some spend quite a while at the feeder. Others fly up and leave almost immediately. Some visit the feeder dozens of times a day. Others feed in the morning and then go elsewhere throughout the day.
Other Wildlife Considerations
All of the previous discussion on camera setup is generally applicable to other animals.

Like people, animals usually move in the direction they are facing. Allow some space in front of them. When framing the shot, try to avoid zooming in too much. This does two things. It helps give a buffer in case the animal moves unexpectedly giving time to react and follow. It also helps make the photo look better. The classic rule of thirds serves as a great guide. As an example, the red fox above is uncropped. I was expecting the fox to move down the hill so I lined up to give lots of space in that direction and fairly tight behind.


It doesn't always go according to plan. Sometimes, the critters move very fast and highly unpredictably. I will re-iterate the need to shoot with continuous (burst) drive mode.
Post Production and Editing in Lightroom

Birds and animal photos require a few things to keep in mind as part of post production and editing. The first thing I do with any photo, not just animals, is crop and rotate.


Crop out any distracting or extraneous objects such as the white support pole and red rope holding up the bird feeder. Next, I crop to provide some space in front of the subject. If the edge of the frame is very close while the back of the head has lots of space, it will feel cramped. It doesn't feel right because we can't see what the subject is looking at.
Compare the two images below. Both are from the same starting image of the big horned sheep. All I have done is adjust the cropping.


After cropping, I use the masking tool to select the animal. The first four (Subject, Sky, Background, People) use Adobe's AI wizardry to select the applicable parts of the image. Select Subject works most of the time. If needed, a bit of add/subtract can be done with the brush tool.

We want to emphasize the subject to help it stand out from the background. A slight boost to the Exposure brightens it up. Next, the Texture and Clarity sliders serve to bring out the detail of the fur, eyes and horns. I also bump up the Dehaze a little bit even though there is no haze. This is to counteract the adjustments we're going to make to the rest of the image in the next phase.

Close the mask tool and return to the general tone control section. Take note of the Presence section. Negative values for Texture, Clarity and Dehaze serve to soften and almost blur the image. We've done the opposite of the mask. The result is an image with the subject popping more while the background is softened. Another way to think of this technique is the bokeh effect from the wide aperture is accentuated. Rounding things out, I boost the vibrance for more vivid colors.
Let's compare before and after.


The same techniques work with birds and other animals.


In closing, I encourage you to get out there and give it a try. Patience and practice are the keys to improving!

Comments